Showing posts with label dessert. Show all posts

Monday, February 22, 2016

Super Bowl Stadium Cake


I'm from Colorado, and I admit it: I'm a total fair-weather Broncos fan. When they're doing well I'm really into it, but when they're losing I'm on Pinterest while everyone else screams at the TV. But, when they won the AFC Championship in January, you can bet that we were planning a Super Bowl party as soon as the score went to "Final." The request was for me to "make something Pinterest-inspired, because she likes that."

A little intimidating, right? But hey, I'm up for a challenge. So I hopped onto my favorite site (sorry, Netflix) and searched for anything Super Bowl related. I finally stumbled across this original post at Coolest Birthday Cakes. I thought, "sure, that's a cinch! Totally easy." Yeah, those words would come back to haunt me. 

The Process:
So if you look at the original post, you can see that there's some instruction, but very little. My original plan was to dye the cake batter orange and blue for a Broncos theme, which I did. Unfortunately, it took forever and a day to get the orange just right. It would have been soooooo much easier had the Broncos' colors been blue and peach. But possibly that's less intimidating? I digress. Because it took about 6000 drops of gel coloring, I beat the batter too much and the cake barely rose. 

Long story long, that cake ended up going into a blue and orange (at least it was orange!) trifle that I took to church. And that left me with exactly no back-up cakes. Since I bemoaned the lack of instructions on the original post, here are the first steps that I took. If you have a better way of doing things, please comment and let me know!
  1. Grease and flour the heck out of two 9x13 pans, making sure they have straight edges (instead of slanted).
  2. Bake two cakes, praying feverishly that both turn out okay.
  3. Do a little happy dance when both cakes turn out just fine (well, even!)
  4. Flip them over and line the pan with a little plastic wrap, then freeze the cakes for at least 6 hours.
  5. Cut one of the cake into thirds, length-wise.
  6. Re-freeze the thirds to make sure they'll be fine.
  7. Put the two end pieces on either side of the 9x13 and do a light crumb coating in between/around to make sure everything sticks together well. The middle cake will be your playing field, and the sides will be your stadium.
  8. Cut the middle third on a diagonal, making two triangular-shaped pieces. Hint: if you're like me and are too worked up to do this by yourself because it's 11:30pm the night before the Super Bowl and you have no backup cakes and no time to fix it if something goes wrong, have your dad do this. 
  9. Quickly flip the triangular pieces on top of the two sides, making sure both pieces are facing the field at a 45-degree angle (woohoo, I just used geometry in real life!).
  10. Do another crumb coating on top of the whole cake.

Okay, so that's the assembly part. And yes, I am a dramatic person, especially when I'm baking late at night. But here's the part I haven't told you yet - this was also my first foray into fondant. Which I (stupidly) thought would be easy. Not so much! Anyways, I followed this recipe from Cute DIY Projects and to be fair to them, when I say I "followed it" I mean "looked at it briefly and ignored all their hints." Anyways, I made a little green fondant and a little white fondant. It all ended up working out.

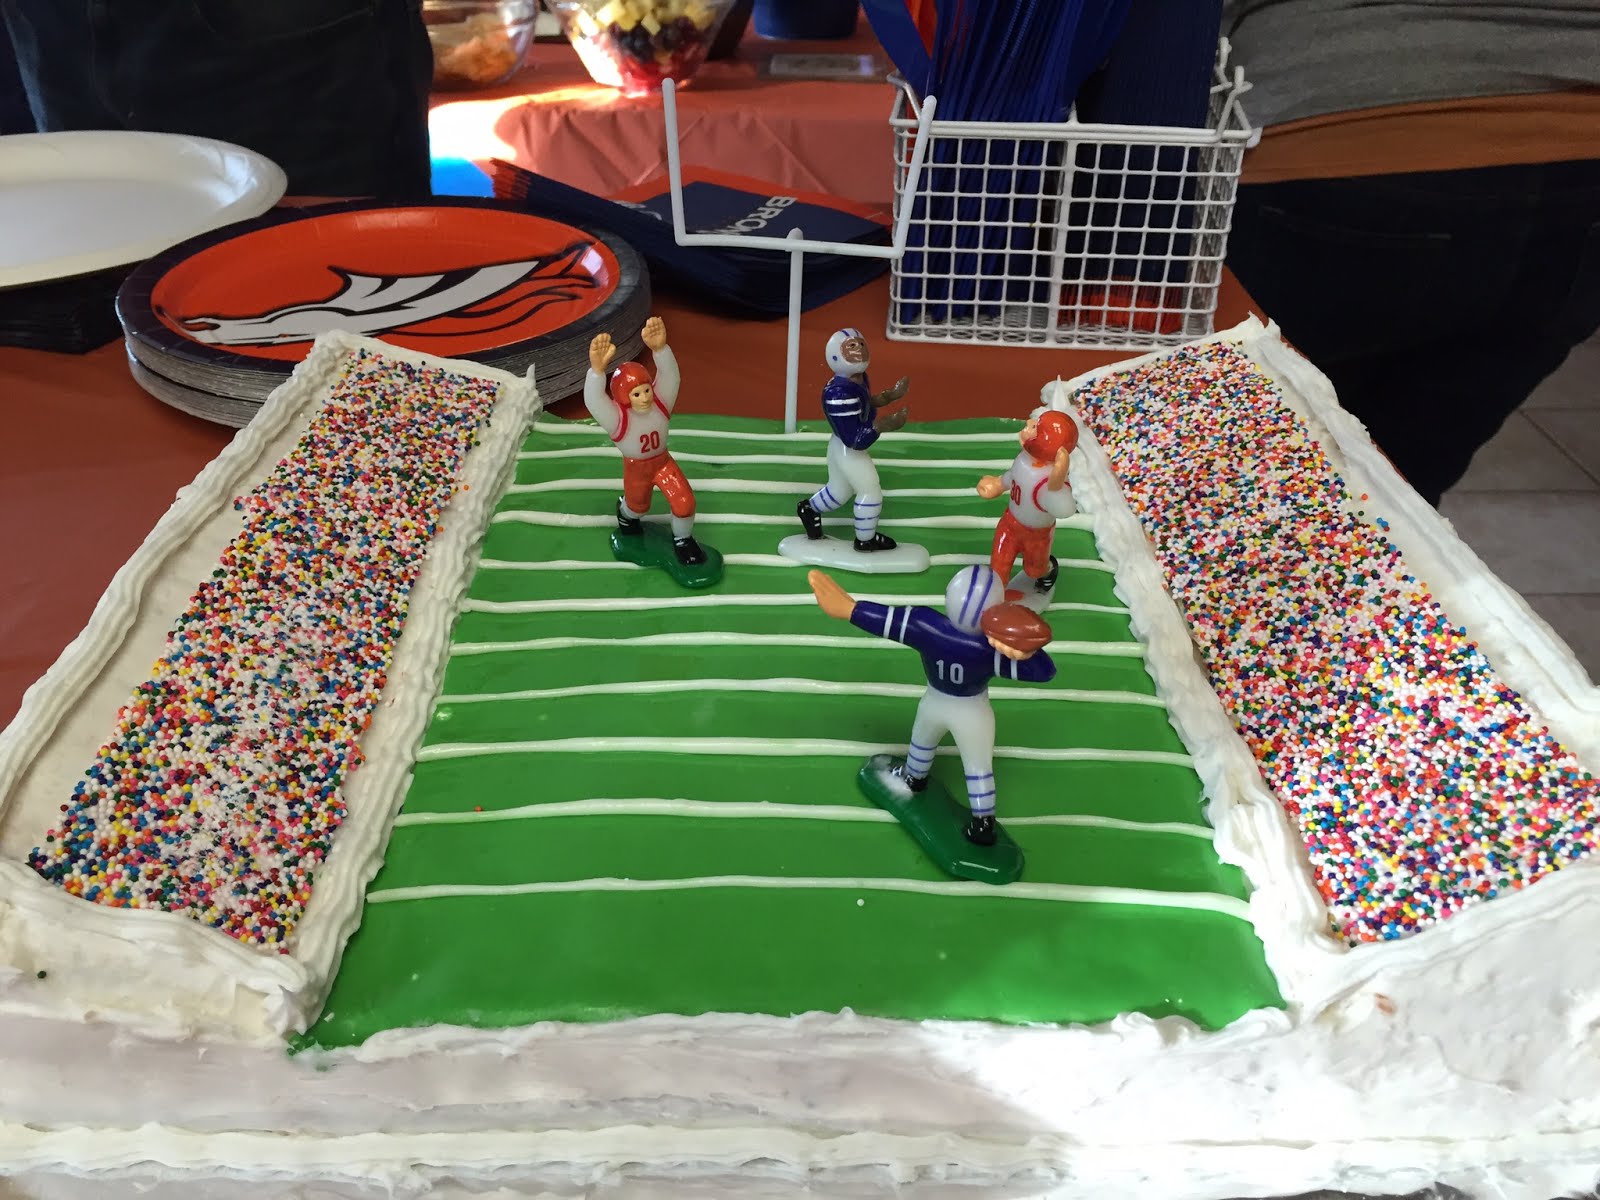
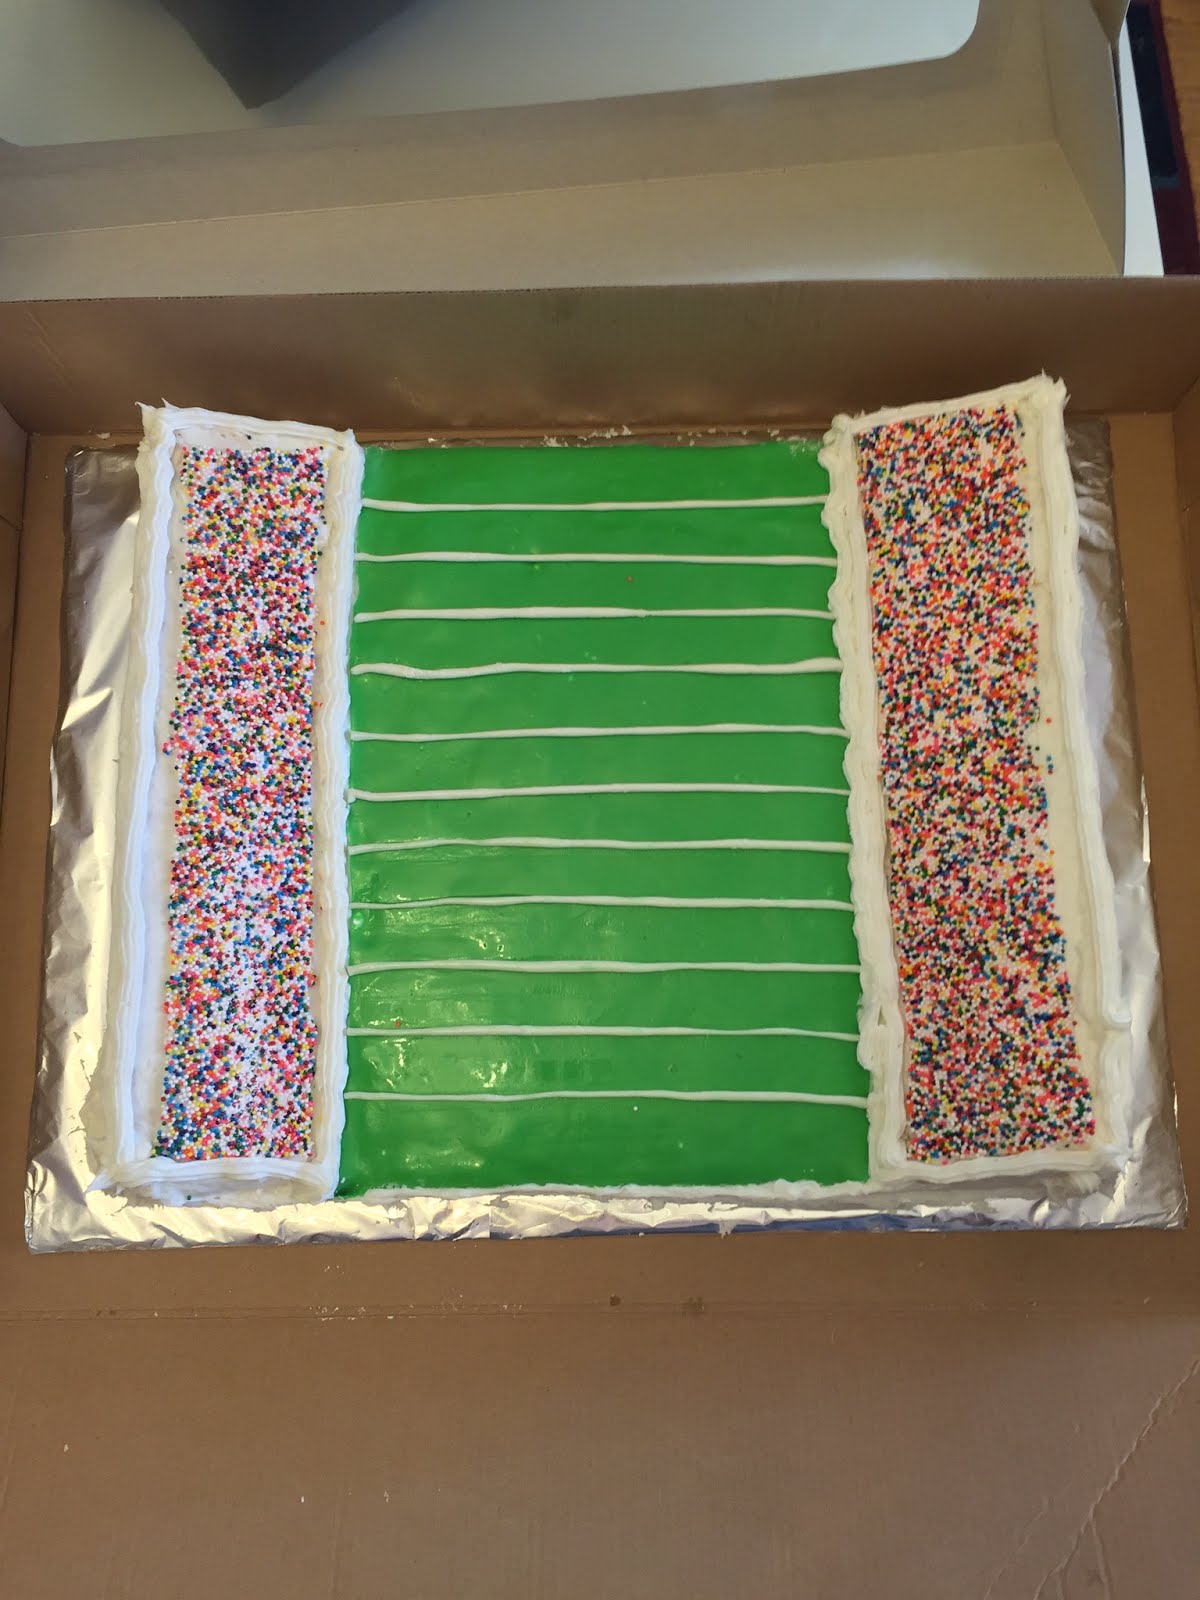
So the next day (Super Bowl Sunday!) I frosted the whole cake pretty well, then rolled out the green fondant to the size of the field cake. I put it on and got it... well... mostly smooth. 85%. Still counts. Then I rolled out the white fondant into small strips the size of the stadium stands, and put a little bit of buttercream on top. Then I sprinkled about 8000 (rough estimate) multicolored sprinkles on it to look like fans. It helped give me that really square look that I wanted for the stands, so that was nice. The fondant stretched a bit when I put it on, but I think it was still easier than trying to get the sprinkles on in a square a different way. With time running out before we had to leave, I quickly rolled tiny strings of white fondant to be the yard lines. Perfect? Heck no. Worked? Yeah, mostly. After piping around the sides I declared it good enough and setted in to watch the Broncos win the Super Bowl. Woohoo!


The Result:
Not gonna lie, I got a lot of "ooohs" and "ahhhhs" when I took it out of the box. Everybody seemed to really like it, and when we put the little figurines on top (that we already had) it seemed to complete the look. Most people that commented said "I can't believe you made this, I thought it came from a store!" Still trying to decide if that's actually a compliment, but I'm going to take it as such.

And there you have it: the actual process of making a really time-consuming stadium cake. I wish I had done some things differently (the yard lines bother me a bit, and the fact that neither team name is in the end zone), but for the most part I was happy with it. I'm not the world's best cake-decorator, so I think this is helping my "skills." I'm still pretty happy with the result - looking forward to next year's game! 


Saturday, September 5, 2015

Billionaire Bars: Pinterest Recipe Review

I have to confess: I have been wondering all night why these are called "billionaire" bars. Not only have I been wondering, I've been thinking up different reasons in my head.

"Maybe it's because you have to be a billionaire to afford all this butter!" Snicker snicker snicker.

Then later on:

"Maybe it's because only a billionaire has time to let these layers cool before adding the other one!" Chortle chortle chortle. 

I've been smiling at my (supposed) cleverness all night, guys. I need help.

Then, as I was washing the pan a few minutes ago, I grabbed a finger full of the middle "billionaire" mixture. 

"Dang, that's rich." I thought.

That "ding" sound you heard was the lightbulb coming on in my head.

So, yep, these are billionaire bars because they're really stinkin' rich. D'oh.

These were both easier and harder than I thought they'd be. Easier because truly, they come together really quickly. The dough is a snap and it's really not that hard to stir together the ingredients for the filling. The main reason it was at all harder is because of the time to wait between layers.
Shortbread in the making
I will be super super honest here and say that I did not wait until each layer was cool before I added the next. Part of that is impatience, and part of that is the fact that it was after midnight and I just wanted to go to bed. 

Aaaaanyways. The recipe is really straightforward, but if you're like me, you may do a double (or triple) take when you realize there's a full 1.5 cups of butter in this recipe. You could also call them "Double Bypass" bars I guess, but that wouldn't be nearly as catchy as "Billionaire."
BUTTER
The "Billionaire" middle

The middle won't get super hard, but slightly firm
The original recipe (found here) said to drop spoonfuls of the chocolate and swirl, but instead I covered the whole thing in milk chocolate first, then marbled in a little white chocolate. My first marbling! Awww. The end result was so pretty, I barely wanted to cut it!
Marbling - my first attempt!
The Result:
Sweet goodness, these are awesome. I took them to a tailgate (go Air Force Falcons!) and they were snapped up in seconds. I had women crowding around me to get the recipe. I ended up freezing them instead of just putting them in the refrigerator, and dipped a sharp knife in near-boiling water to cut through the hardened chocolate on top. All in the name of good pictures!
Size is only for pictures - cut in 1x1 chunks
These were slightly more time-intensive than I thought, but they're certainly worth it. Plus, they're best in 1-inch by 1-inch chunks. Anything more is a little much. Enjoy!
Billionaire Bars


Tuesday, September 1, 2015

Creme Brulee Cake: Pinterest Recipe Review

Creme brulee is one of my favorite things ever. I don’t know what it is, but I swoon over this dish. When it’s done well, the combo of creamy custard and crunchy sugar (let’s be honest, LOTS of sugar) makes me hear the heavenly harps.

So for my birthday last week, I decided to try a recipe that has been saved on my phone for about three years. It’s found here, at The Baker Chick. Since it’s a crepe cake with layers of custard, I thought it would be similar to blintzes, another favorite food. So, how did it all turn out? Read on!

The Recipe:
The original recipe can be found here, via The Baker Chick.

The Process:
I am the first to admit that I started this cake waaaaaay too late. I think I started on the crepe batter about 7:30pm the night before my birthday, and when I saw that I needed to let the batter sit for two hours I was more than a little irritated. But oh well, it sat. And it didn’t feel lumpy or unmixed when I poured it onto the pan - the sitting was a beneficial step eventually, but it just meant more time for me.

While I let the batter sit, I made the custard. So very easy! The custard itself came together in about five minutes, then joined its friend (crepe batter) in the refrigerator.

A few hours later I decided to start cooking the actual crepes. The recipe told me it would take about 1 minute per crepe on the front side, and 20 seconds on the back. LIES. I don’t know if I’m inept at making crepes (totally possible), was using the wrong heat, the wrong pan, etc., but it took about 5 minutes per crepe. So if you calculate out that I did 21 crepes… well, it’s a lot. A tip: make sure to spray the pan with cooking spray between each crepe. Because these crepes are so thin, that’s the only way they’ll come off.

Actually putting together the cake took about a half hour, and I have to say that the ratio of crepe to custard was perfect. I didn’t have much custard left over, and it all came together nicely. Woohoo!

The Result:
Here is the pic I took of the outside:


And the inside:


For as much work as it was (I think it ended up taking about 3 and a half hours total), let me tell you something: this cake was one of the best things I’ve ever eaten! DELICIOUS. My family of 5 devoured about half in one sitting, but it was so rich we came back for more the next day. The custard and crepes complement each other perfectly.

I would absolutely recommend this recipe! Just be wary that (if you’re like me) it will take a heck of a lot longer than it says. I saw 9-inch pre-packaged crepes a few days later, and if you’re in a hurry this may work out well. The custard itself was amazing - I was thisclose to burying my face in the bowl and eating my way out. Bon appetit!